I am looking to upload a large PDF into PlanetPress Connect Designer so I can add a background image to each page. I tried creating a PDF-based Print template, but when I try uploading the large PDF, the software stalls and says (Not Responding) in the top tab. Is there a better way to do this that is faster and will not stall the software?
What means large? How many pages? What file size?
You may try with more memory for the Datamapper and Merge engine.
I actually was able to figure this issue out. I was looking to upload a PDF that was thousands of pages long. All I had to do was this: Clicked File → Add Data → From File Data Source, changed the file type to PDF/VT file(*.pdf) in the file type dropdown menu, then found the PDF that I wanted to add a background image to and selected it. I then clicked the Open button, the Next button, then the Finish button. After that I added an image to the Image tab in the Resources tab and dragged the background image onto Media 1 in the Resources tab. Then I went into the Background settings of Section 1 and under the General section changed Image to From PDF DataMapper input and clicked the OK button.
@MartinS I tried following the process above and it only loaded part of the PDF. Know why that might be? The size of the PDF is 15460 pages and each record is 4 pages. The PDF I currently have is 8" by 11" paper, but eventually I will want to print the PDF on 11" by 17" paper.
In this scenario I would suggest to create a Data Mapping configuration using DataMapper and use boundaries to divide the input into records. This way the Designer only needs to show the pages for a single record. It will probably improve the output performance too as it can use multiple engines.
- Choose: File > New > Data Mapping configuration > Files > PDF. The Data Mapper perspective is shown.
- Located the Settings panel and navigate to the Boundaries section
- Set the trigger to “On page” and by setting the “Number of pages” to 4. Notice how the record count will reflect the number of documents in your input file.
- Go back to your template and set the Background setting for the Section to “From PDF DataMapper input”. This will show the for pages of the respective document. Use the browse options in the Data Model view to switch between documents.
This should make things bite size chunks for the application and allows you to for example add things like stationery backgrounds (via Media).
Are you generating output from OL Connect Designer or via OL Connect Workflow?
Hope this is of some help,
Erik
@Erik I am generating output from OL Connect Designer. I can’t see the Data Mapping configuration in OL Connect Designer. Is DataMapper a completely different software?
Are you on PrintShop Mail Connect?
If you follow the instructions above it will create a data mapping configuration. This invokes the DataMapper user interface. This capability is available for PlanetPress Connect and PReS Connect but not on PrintShop Mail Connect.
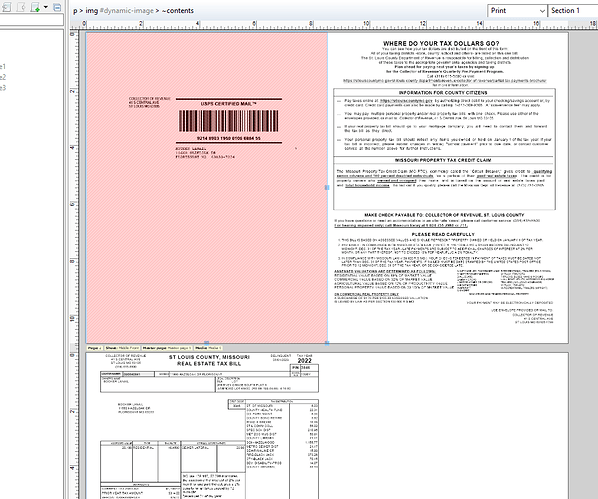
Someone else was able to help me get the document to be mapped properly using DataMapper and it looks good in Designer. A new issue I am dealing with is that the first page of the document has a red-stripped background on top of the PDF. Have you ever run into this issue @Erik? Attached is a screenshot of what I am talking about.
From what I can tell based on the screenshot it seems that the box is slightly higher than the available space (the space available between the page margins). This triggers the logic to mark objects when a pagination issue occurs. Does changing the height solve things? (reduce the height).
How do I reduce the height of the image? I didn’t add boxes to the template.
Instead of reducing the height, try right-clicking the image followed by “Convert to Absolute”.
You could use the gripper in the lower right corner.
So if I understand things correctly there is a section background set based on the PDF data mapper background and an image on top of that. Is that correct?
Hi Everyone,
Just letting you know this has been handled via support ticket and we converted to absolute to get rid of the boundaries issue, and we forced a page break after the second image to ensure a page is generated to display the last 2 images. I also took the opportunity to go through impositioning options in the output preset as this handles this case perfectly with no programming.
Thanks. Regards,
