When you’re working with Dynamic PPDs, there’s no need to open a support ticket. The support ticket was specifically for the creation of a valid PDC file based on your PPD. Prior to 2018.1, a PDC file was the only way to interface Connect to a PPD and they could only be created internally.
Now, with the dynamic PPD options, you’ll simply load the PPD and begin setting rules.
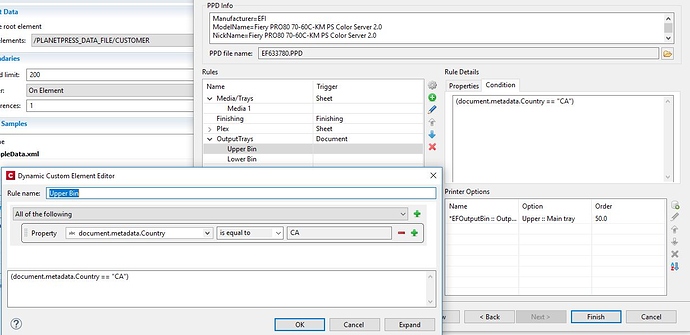
For example, here’s a very simple rule I set up to output to the Upper Bin of my printer
To begin, I created a new Custom Group named OutputTrays. This is both for organizational reasons and to assit with ordering the commands. I’ll come back to that.
I then added a new Rule to this group. I don’t have anything fancy going on with this one. The condition is simply true, so this always applies if I’m using this output preset. I could have made this data driven, however. Perhaps every print job for Canada goes to Bin 1 and every job for the US goes to bin 2. As long as the country is indicated in the data, it can be accessed to drive this selection.
This might look something like this
Finally, I choose the Printer Options to apply to this rule.
This lets me dig through all of the options defined by the PPD and select which ones to apply when this Rule is true.
Now, to come back around to ordering commands. Note that it says Order 50 next to the output bin. You’ll see that various rules from the PPD have different order values. 25, 50, 100, 1, etc. This indicates the order in which the printer expects to see these commands in the code. Lower values should be placed higher in the list. Likewise, groups containing rules with lower values should be placed higher in the list of groups. So by creating a new group for this, we allow ourselves the freedom of moving them around easily to match the required ordering.
You may have to do a fair bit of experimentation with this as well, as not all PPDs are created equally. For example, in this PPD my Upper tray call actually goes to the lower tray on output and the Lower tray call goes to the upper. Seems there was a typo in the PPD. Go figure. I’d suggest taking this one step at a time and testing your output with each change.
One last note: Since you’re working with four different printers, you will end up making at least four different Output Preset files, one for each printer. Recall that you can call them dynamically in the workflow based on whatever criteria you need.


