JavaScript to display banner page when field value changes

I have a JavaScript I created to disable all sections, then turn them all as needed. However for the banner page I am not able to compare a previous value to current value. So I am looking for additional help.

The banner page should always print before first record, then anytime my field value changes.

Here is my current code. Of course if there is a better way let me know.

Hi Ricoh_Glenn,

I struggled with that one for ages. The javascript I had just would not work so I went another route which used workflow metadata plugins and fields created in the data mapper. Take a look at this post and see the link in my question. That will get your banner page working 100%.

And you forgot to add your code.

Regards,

S

Ok, I downloaded and opened this template. I do not have a true/false field in my data.

I do see this job having one, but sure where it is coming from, so correct me if I am wrong.

Is the coverpage_Required field (which is grayed out) a javascript field based on a value change from another field?

If you follow THIS how to you will see how that template and workflow was created. The boolean fields you see in the template is created in the data mapper by right clicking the Record in the right Data Model pane. Then select Add Field. Once field is created right click it and set its type to boolean and give it the default value.

The coverpage_Required field is used in workflow to toggle the cover page to on and off using metadata and metadata plugins. (Note the control script in the template that does this.) You will need to follow Addendum 1 and add the metadata level creation plugin above the metadata fields management. In its properties select group delimiter and set to ‘begin when’ and its rule to… Add a condition, paste “GetMeta(_vger_fld_InsertYourBooleanTemplateVariableHere[0], 10, Job.Group[?].Document[?])”, without quotes in the first/left section, change middle to ‘value changed’ and right section leave blank. This will group your data to when your field changes.

When working with metadata set a breakpoint just before or on the metadata level creation plugin then look at the metadata via the ‘view metadata’ option on the debug tab in workflow, close it and step through your process then reopen it to view the changes in your data. You can see what the above plugins are doing to the data there.

Everything is in the link above. Shout if you need any other help.

Regards,

S

I still need more information. I am on step 4 Building the workflow process.

I added my Metada Fields Management and I see Action, Field Information, and Rule.

However the instructions says I need to click on a green check mark, so either I am not doing something correct, or the instructions are not correct because there isn’t a green check mark., and nothing about a condition exist. So something is missing.

Go into rule by clicking on the ellipses button, in the window that opens on the top left of the window is the green check mark you are looking for. There you will add the condition.

By the way, if you are going to use the meta plugins in workflow and your job is ± 20 000 sheets it will take about three hours for the process to complete. I found that out the hard way. If you need speed I have a metadata script that will do it in two seconds. (thanks to Objectiflune.)

Yes please provide that with as much details on how to use it. I am really new to Metadata. I will try to find the green arrow.

I do not have an eclispse button. I have General/OnError.COmments tabs

Fields Operation with Action, Field Information, Rule

I can add an operation which only adds a blank operation with no green arrow.

Now when I add an action I can add a field, then I can add a rule. But I have no idea what action or field information to add.

The instructions doesn’t say. So I still need more information. In action I can see the following

Add, Duplicate, Append, Sum, Delete

In Field Information I see

Level, Field Name, FIeld Value

Then in rule I see the green check mark

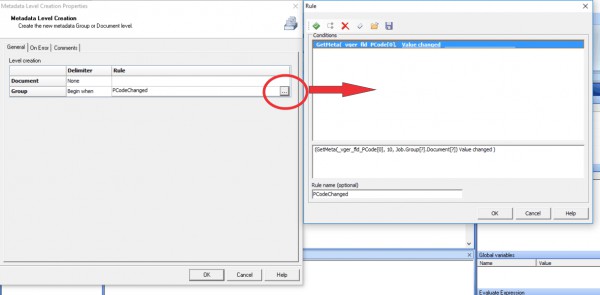
Evie gave me this. It is the template and workflow created in that how to. What is missing however is the part about “Addendum 1: Cover page at a different level”. So I have added screen shot here.

Here is a screen from the linked project regarding the meta field management plugin.

Are you using Workflow 8? Are your screens the same? I will send the meta script via PM.

Ok, for my various Languages job I have a solution without Metadata. Sharing for those who want to learn. This is only if you have a Language field that.

Example:
Record1
Jane Smith
123 Fake St
Fake Ca 12345
English

Record1
John Doe
321 Fake St
Fake FL 54321
Spanish

First after your datamapper is completed start a new template. You will need a print section for each language and a banner page. My example I have six languages, and one banner page as shown below.

BPg
ENG
RUS
SOM
SPA
VIE
ZHO

In the Scripts section create a new control script. (Note must be a control script) and type the following code.

// Note 1 edit for your fields.
// Note 2 PreLang is not defined yet. Do not define it in this script
// Note 3 This must be the first script in the list

var CurLang = record.fields.LANGUAGEPREFERENCEGRO;

merge.template.contexts.PRINT.sections.BPg.enabled = false;
merge.template.contexts.PRINT.sections.ENG.enabled = false;
merge.template.contexts.PRINT.sections.RUS.enabled = false;
merge.template.contexts.PRINT.sections.SOM.enabled = false;
merge.template.contexts.PRINT.sections.SPA.enabled = false;
merge.template.contexts.PRINT.sections.VIE.enabled = false;

if (PreLang != CurLang)
{
merge.template.contexts.PRINT.sections.BPg.enabled = true;
}

if (CurLang == “ENG”)
{
merge.template.contexts.PRINT.sections.CurLang.enabled = true;
}

if (CurLang == “RUS”)
{
merge.template.contexts.PRINT.sections.RUS.enabled = true;
}

if (CurLang == “SOM”)
{
merge.template.contexts.PRINT.sections.SOM.enabled = true;
}

(CurLang == “SPA”)
{
merge.template.contexts.PRINT.sections.SPA.enabled = true;
}

if (CurLang == “VIE”)
{
merge.template.contexts.PRINT.sections.VIE.enabled = true;
}

// End of Code

Now create a new control script with the following code.

// Note this must be the last script in the scripts section
PreLang = record.fields.LANGUAGEPREFERENCEGRO;

// End of Code

Now add All your elements to your sections as needed. The banner page will print before the first record, and anytime the language field changes. It is best to have your data grouped/indexed by language, then other indexes as needed.

What I liked about planet press 7 is this could have been done with a on value change, and conditions on each section. Connect doesn’t allow conditions on the print section for a reason I do not know. I will try to help if you have questions, and even share a test template and data.
I agree 100% the on value change option needs to come back. A very handy condition used allot in PP7.