Explanation different levels for output

Hello,

can anyone explain the differences between the different levels for grouping/metadata/output variables?

For example, I do not understand what exactly “document” level means. I always thought it means a record (all pages and sections of a record make a document). But now I tried to use the output variables “document.nr” and “sheet.sequence.document” for additional text, but do not get the expected result. Instead of counting the sheet number within one record it counts through the complete job.

Sadly, I can not find any explanation to the different levels in the documentation.

Regards,
Thomas

You’re correct in your description of the Document level. It is pre-defined as the ensemble of pages relating to a single record. However, document.nr would give you the document number within the Document Set. If no other user defined groups have been defined, then the Document Set will contain all of the documents generated from your data set and the number would increment once per document.

If you want the page or sheet number within the document itself, you need to use page.nr (page.sequence.document) or sheet.nr (sheet.sequence.document) respectively. Similarly, if you want the total page or sheet count within a document, you’d use document.count.pages or document.count.sheets respectively.

There’s an invaluable reference for all of these here: Variables available in the Output

User Defined Groups

These groups are all defined in the Job Creation Preset. If left undefined, there will be one of each comprising the entire set of data. These consist of

Job
Job Segment
Document Set

Your primary goal with these would be to group up your data into logical separations. For instance, assume you had a mailing destined for recipients in both Canada and the United States. You might begin by grouping by Country at the Job level in order to separate the US and CA recipients.

Now assume you are incentivized by your respective mailing agencies to further sort the mailpieces. You might choose to group by State/Province at the Job Segment level. Then, most likely, you’d want to group up by individual postal codes at the Document Set level.

So everything is grouped up now. What can we do with this? Well, one thing would be to actually split up the output. If we were to choose to separate on the Job level at this point and print to PDF, we’d get two PDF files. One for the US and one for Canada.

Similarly, if we were to choose to split at the Job Segment level, we’d expect a fair few more files on output.

Metadata and Output

So now we have a pile of files that are likely largely unidentifiable. We need to get them named according to their State/Province. Now we’ll invoke some metadata. Given that we’ve just split this at the Job Segment level, we need to also define our metadata at that level in the Job Creation Preset as the separation level is the only level accessible to the Output Mask

${segment.metadata.State}_${template}

Therefore gives us names such as

AB_TemplateName_0001.pdf
AZ_TemplateName_0011.pdf
BC_TemplateName_0002.pdf

If I wanted to add more information to the filename (country, zip, or other) these fields all must be added to the Job Segment level here. You can add as many as you like.

${segment.metadata.Country}_${segment.metadata.State}_${template}

Similarly, you can use the Output Variables in the name or on the page by way of Add Additional Content. You just need to be sure to respect your separation levels.

For instance:

${segment.metadata.Country}_${segment.metadata.State}_${segment.count.sheets}_${template}

This inserts the total number of sheets generated by each of our separation options. Giving us name such as these

CA_AB_2_TemplateName_0001
CA_BC_4_TemplateName_0002
CA_MB_2_TemplateName_0003

On the other hand:

${segment.metadata.Country}_${segment.metadata.State}_${document.count.pages}_${template}

This results in an error. We’re asking it to split at the job segment, but to insert the page count for the document in the name. Well… which document? Each split file potentially contains multiple documents.

In such a case, the only place we could realistically use document.count.pages would be on the print page by way of Add Addtional Content.
2 Likes

Thank you for that good explanation. That confirms what I know about it.

I have found the reason why my code for additional text/barcode did not work. It was just because of imposition. I only wanted to add cropmarks to my documents (no repition). I recognized it months ago, but thought that buggy feature was fixed (in the past I had that problem with variable output file names while adding crop marks)… :roll_eyes:

Now I add crop marks manually within the design. It works as a workaround but is far from a clean solution.

I’d be curious to see how that template was set up that you’d need to use the Add Additional Content option to add crop marks to an imposition job. These are already generated as an option in the imposition settings themselves.

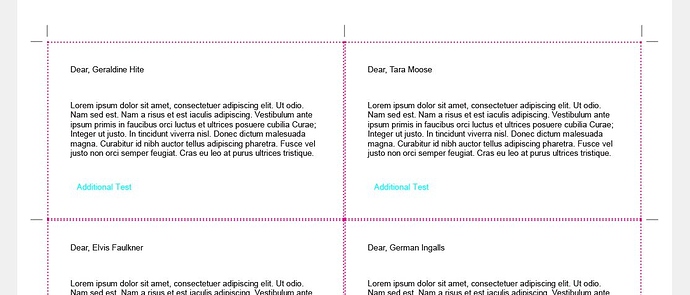
Since Add Additional Content would be attempting to write directly to the imposition pages, it may not even have access to the area of the sheet where the crop marks are needed. Consider the following example where we have a 5x3 page imposed on letter paper in a 2up layout. The magenta lines represent the edge of the page that’s being imposed. The cyan text is being added by Add Additional Content, which is effectively bounded by that magenta box. We can’t print outside of that area with this feature. So it would be impossible for it to add crop marks to the impositioned layout.

The only way I could see that being feasible would be to ensure that the imposition pages fit the print area exactly. But even so, it seems like a lot of trouble to go through to place each mark individually.

As for the variable output name, I’d wager that you may have had your metadata at the wrong level for it to work. As per the imposition documentation:

If Impositioning is used then the only metadata that will be available to the job thereafter will be the metadata at Job Segment level

Ok, maybe I did not express myself correctly.

I do not need additional content for crop marks. I need additional content to add a variable datamatrix code on each page. I use following script for the additional barcode.

${segment.metadata.JobID}${format.formatNumber(sheet.sequence.document,‘00’)}${format.formatNumber(document.count.sheets,‘00’)}${format.formatNumber(sheet.sequence.job,‘000000’)}${
var totalSheetsDoc = document.count.sheets;
var sheetSequenceDoc = sheet.sequence.document;
var totalSheetsJob = segment.count.sheets;
var actualSheetNr = sheet.sequence.job;
if(actualSheetNr == totalSheetsJob){
“0001”;
} else {
“0000”;
}
}

The code above works just fine without activating imposition. With imposition it does not work (error while output).
As you can see I only use standard output variables and one metadata field on jobsegment level.

The page size of my print template is A4 (210 x 297 mm) and I have set bleed around that (11.5 mm per side). My goal was to add crop marks within the bleed. To achieve that I have to activate the output option “imposition” and there I activate the crop marks.
I do not need repition! I only want to add the crop marks within the bleed area.

PS: I do not add crop marks manually. I use a script to add div boxes dynamically (with border on one side) where I calculate the right sizes and positions, based on the page size and bleed area size. But manually adding these div boxes would be no problem too (in my case).

I can understand, that the combination of additional content with some output variables and imposition can lead to conflicts. What I complain about is the lack of possibility to set crop marks within the bleed area without activating imposition.

I admit, I’m having trouble replicating the error’s you were encountering.

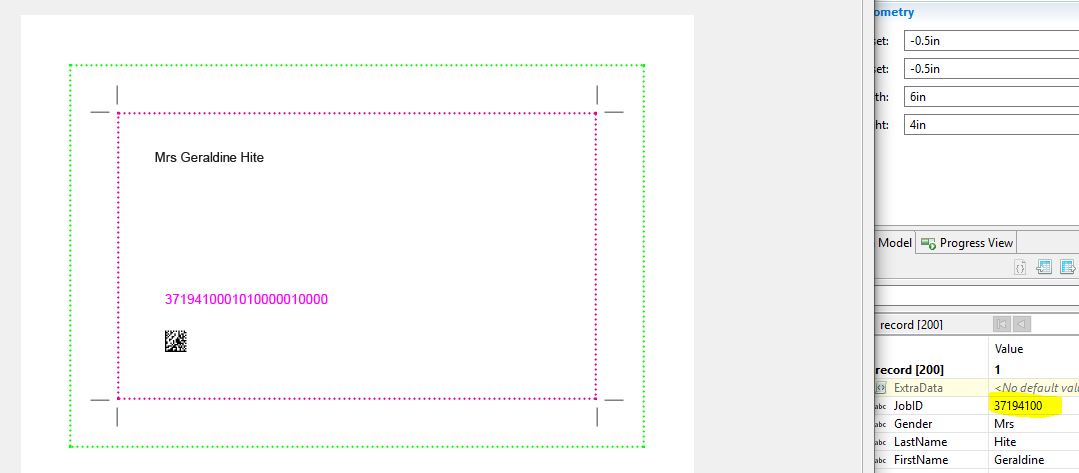
In the following image, I’ve implemented your script, added a bleed area, activated Imposition and Crop marks, but have not done any n-up. Both the text and barcode generated by your code are showing just fine, though I did have to replace the single and double quotes in your script. I assume that’s just an artifact of copy/pasting from the web here., however. There might be some other things missing there too since it looks like you used a Blockquote markup instead of a Preformatted text markup.

The area between the green and magenta lines is, of course, the bleed area. Inside the magenta lines is the print area.

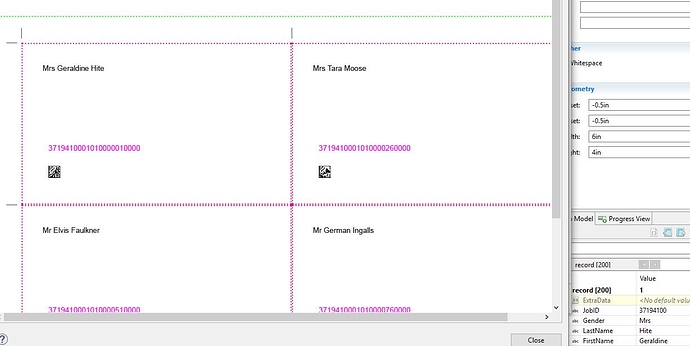
And here is the same thing, but in a 4-up layout.

I’ve uploaded my resources here (2019.1 required) if you want to take a look. Maybe you’ll see some difference in what we’re doing:

ftp://OLCA18:MKXMScjE@ftp-ca.objectiflune.com/app-ftp-users/OLCA18/

That link will remain valid for 30 days. Note that this is based on randomly generated data.

Thank you for your assistence. I have tried my code again and now it works. Maybe I have tried it with an old presets version where I have used the jobID metadata on document level… :roll_eyes: